
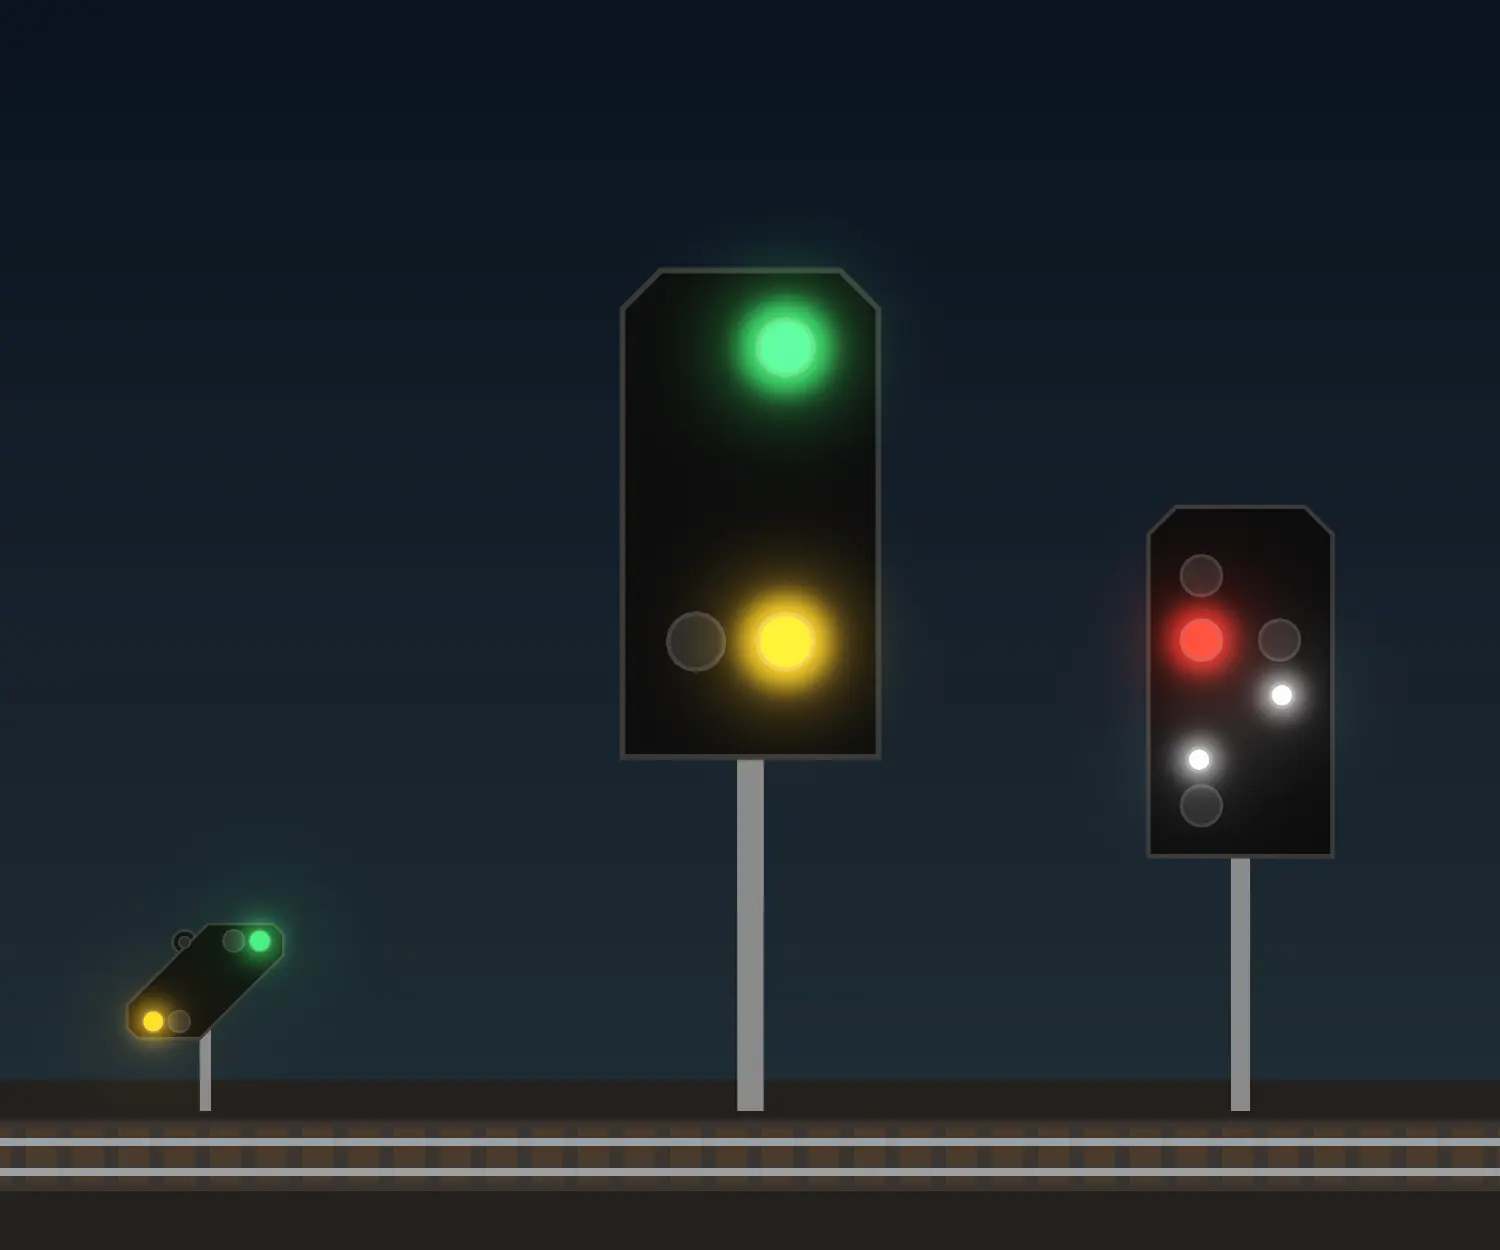
German signals are the part of a model layout that goes wrong most often. And plenty of the advice you find on forums and in shops is wrong too.
While building Hive-Rail I needed to draw signals on screen, so I had to work out properly what they look like and when they show what. That turned into two wiki pages: Signal Faces and Choosing and Placing Signals. This post is the readable version. Every rule comes from the DB signal rulebook (Ril 301) or the German railway law (EBO). Where something is just my own advice for a model layout, I say so.
It covers the DB light signals that Viessmann makes for H0 with LEDs: the H/V light signals and the Ks signals. Semaphores are for another day.
The short version
If you only remember five things:
- Every station entrance gets an entry signal, every track a train leaves from gets a departure signal.
- A distant signal stands one braking distance before every main signal and tells the driver what that main signal shows.
- Hp 2 (green over yellow) means slow, 40 km/h. Show it when the route goes over the curved side of a turnout. Straight through is Hp 1.
- A distant signal on the mast of a red main signal is dark.
- Signals stand on the right of the track, seen in the direction of travel.
What they look like
Here is the H/V family, drawn the way the Viessmann models have their lamps:
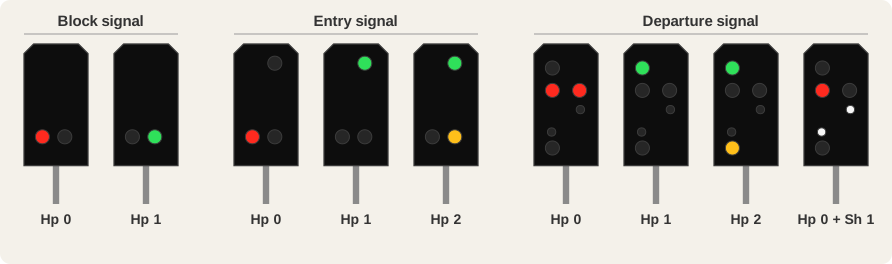
The block signal (Viessmann 4011) only has red and green. The entry signal (4012) adds a yellow for Hp 2. The departure signal (4013) has two reds, and two small white lamps for Sh 1: shunting may pass, trains may not. With Sh 1 one red goes out and the two whites light up, rising to the right.
Why two reds? The rulebook allows Hp 0 as one red light or two side by side. The two reds belong to the older DB departure signals that also show Sh 1.
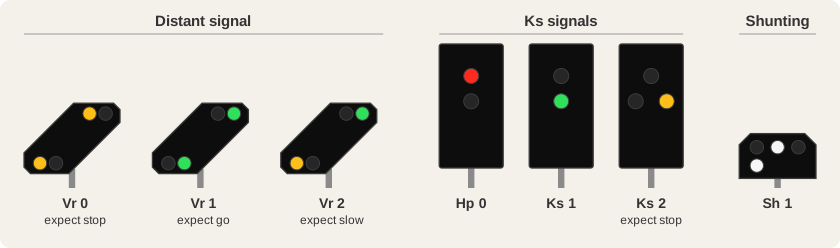
Then the distant signals, the Ks signals and the shunting signal:
Which signal does what
A main signal's job depends on where it stands, not on how it looks.
| Job | Where | Shows | Viessmann |
|---|---|---|---|
| Entry signal | where the line enters the station | Hp 0, Hp 1, Hp 2 | 4012 |
| Departure signal | at the end of each track trains leave from | Hp 0, Hp 1, Hp 2, Hp 0 + Sh 1 | 4013 |
| Block signal | on the line between stations | Hp 0, Hp 1 | 4011 |
| Distant signal | one braking distance before a main signal | Vr 0, Vr 1, Vr 2 | 4010, or 4030 with marker light |
| Main + distant on one mast | where the next main signal follows about one braking distance later | as above, distant dark at Hp 0 | 4014 block, 4015 entry, 4016 departure |
| Light shunting signal | where shunting needs permission, like leaving a siding | Hp 0, Sh 1 | 4017 high, 4018 low |
Does every station need these? Not by law. EBO §14 only requires an entry signal above 50 km/h, a departure signal above 60 km/h, and a distant signal when trains run faster than 60 km/h towards the main signal. So a sleepy branch line without any signals is perfectly prototypical. On a main line, every station has them.
A station on a single-track line
This is the situation you find on most layouts: a station with a passing loop. The pictures are drawn as Hive-Rail's panel, with the signals lying small along the track. Yellow track lamps mean a route is set, red means occupied (that's the train). They show one direction, left to right. The other direction is the mirror image.
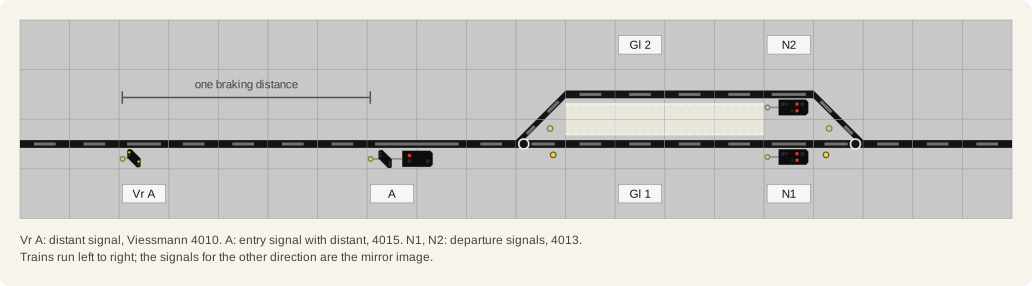
- Vr is the distant signal for A, one braking distance out.
- A is the entry signal. Its own mast carries a distant signal for the departure signals, because they follow soon after. That's a 4015.
- N1 and N2 are the departure signals, one per track, at the end of the track, before the turnout. Two 4013s.
The names are the DB's usual practice: entry signals A and F, departure signals N1, N2 for trains that came in at A, P1, P2 for trains from F. That naming isn't in the rulebook, but you see it at real stations like Deuten.
Now watch what happens when a train goes into the loop on track 2 and out again:
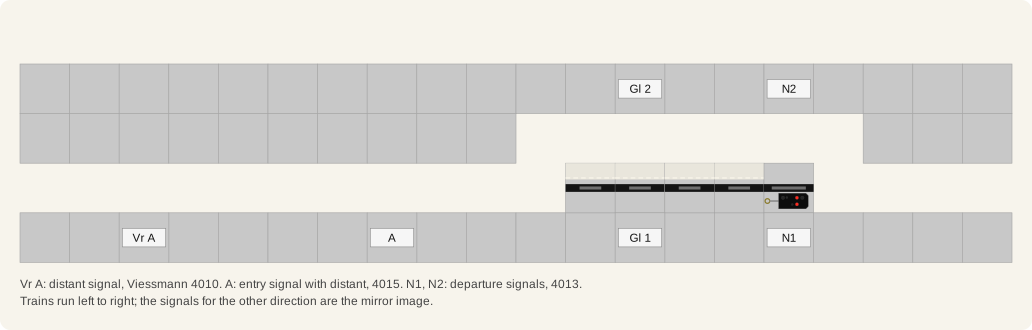
- Nothing is set. The distant shows Vr 0, expect stop. A shows Hp 0, and the distant on A's mast is dark.
- The route into track 2 goes over the curved side of the turnout, so A shows Hp 2. The distant before A shows Vr 2, expect slow. The distant on A's own mast shows Vr 0, because N2 is still red.
- Behind the train, A drops back to red and everything goes back to stop.
- The train waits at N2.
- The way out also goes over a curved turnout, so N2 shows Hp 2 as well.
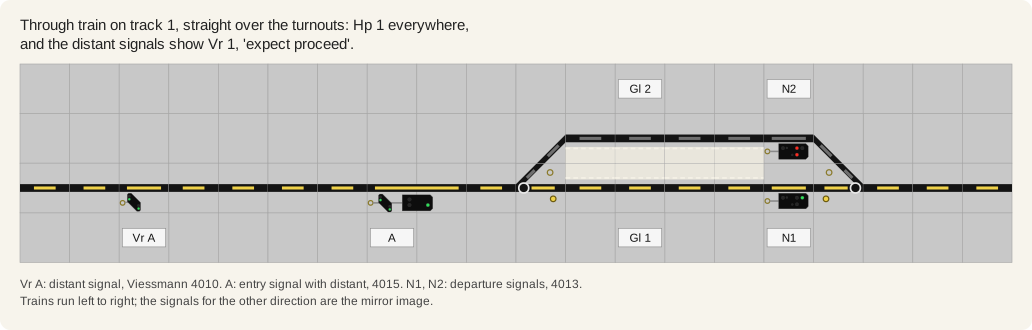
A through train on track 1 runs straight over both turnouts and gets green everywhere: Hp 1, with Vr 1 on the distants.
That is also why you can't use a block signal as an entry signal into a station with a loop. It has no yellow lamp, so it cannot show Hp 2, so it has no legal way to send a train into the loop. It's a very common mistake.
Out on the line
Between stations you can split the line into block sections, one train per section. The question there is always the same: does the distant signal stand on its own, or on the mast of the signal before it?
- If the next main signal follows about one braking distance later, its distant goes on this signal's mast.
- If the gap is longer, the distant stands on its own, one braking distance before its main signal.
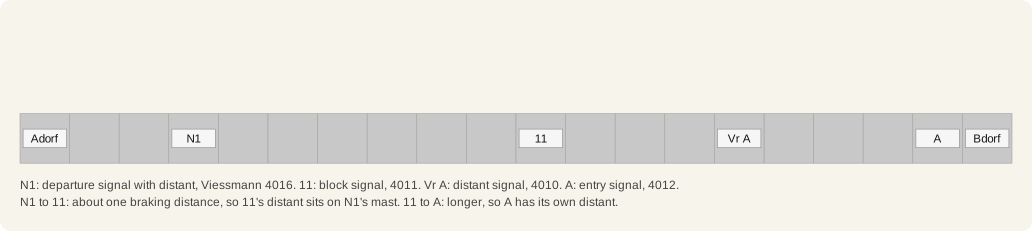
N1 at Adorf is a departure signal with a distant (4016), because block signal 11 follows about one braking distance later. Block signal 11 is a plain 4011, since Bdorf is far away. The distant for Bdorf's entry signal stands on its own (4010). As soon as the train is past, N1 goes red and the distant on its mast goes dark.
Braking distance on a model. On the real railway it's usually 1000 m on main lines, 700 m on some, and 400 m on slow branch lines. In H0, 1000 m is 11.5 metres of track. So on pretty much every layout the distant signal stands far closer than the rule says. The real railway marks a distant signal that is more than 5% too close with a white marker light, which is what the Viessmann 4030 has.
My advice: on a model, just accept the short distances and leave the marker light out. Use the 4030 only where a distance is clearly short even by your layout's standards. Either way, do it the same everywhere.
Shunting
Shunting moves aren't trains, and they follow their own signals.
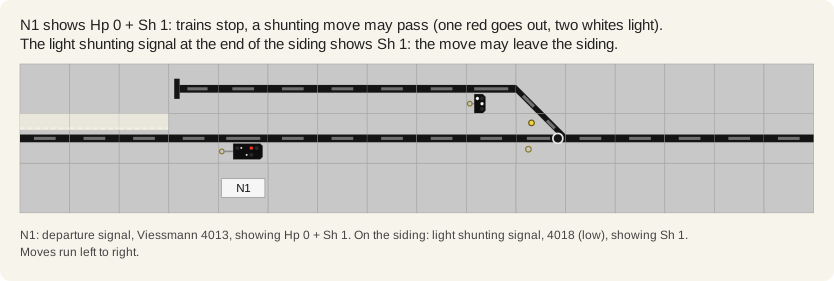
Hp 0 + Sh 1 on a departure signal means trains stop, but a shunting move may pass. A light shunting signal (4017 high, 4018 low) shows two reds for stop, or two whites for Sh 1. You typically find one where a siding joins a main track. And Sh 1 never goes together with Hp 1 or Hp 2: those are for trains only.
Ks: the modern option
The DB has used Ks signals since the 1990s, but only together with electronic interlockings. A Ks signal does main and distant on one screen: Ks 1 green for go, Ks 2 yellow for expect stop at the next signal, Hp 0 red for stop.
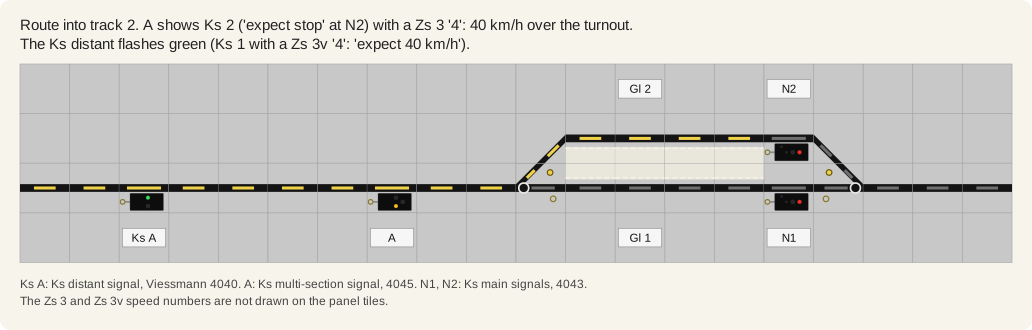
There is no Hp 2 in Ks. Speed goes on a lit number above the screen, the Zs 3: a "4" means 40 km/h. A yellow Zs 3v below the screen announces a speed limit ahead, and then Ks 1 flashes.
H/V or Ks? That's a matter of era. These H/V light signals (the "1969 type" in Viessmann's manual) fit a DB layout from the seventies onward, Ks fits a modern one. Real stations mix systems, but on a model a station looks best when it sticks to one.
The usual mistakes
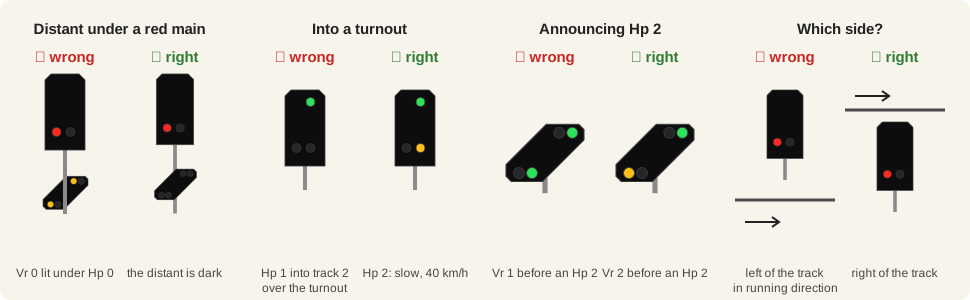
| Mistake | Right | Source |
|---|---|---|
| Distant on a red main signal's mast shows Vr 0 | it is dark | Ril 301 |
| Hp 1 for a route over the curved side of a turnout | Hp 2, or Zs 3 with Ks | Ril 301 |
| Vr 1 before a signal showing Hp 2 | Vr 2 | EBO §14 |
| Signal on the left of the track | right, seen in the direction of travel | Ril 301 |
| Block signal as entry signal into a station with a loop | an entry signal with yellow (4012/4015) | follows from the Hp 2 rule |
| Sh 1 together with Hp 1 | Sh 1 only with Hp 0 | Ril 301 |
| Stand-alone distant without its board | the Ne 2 board, two black chevrons on white | Ril 301 |
| Main signal without a mast sign | the white-red-white mast sign | Ril 301 |
The one exception to "on the right": on double track, signals for running on the wrong track stand on the left.
Wiring them up with MobaLedLib
MobaLedLib drives LEDs through cheap WS2811 chips: three outputs each, one output per lamp.
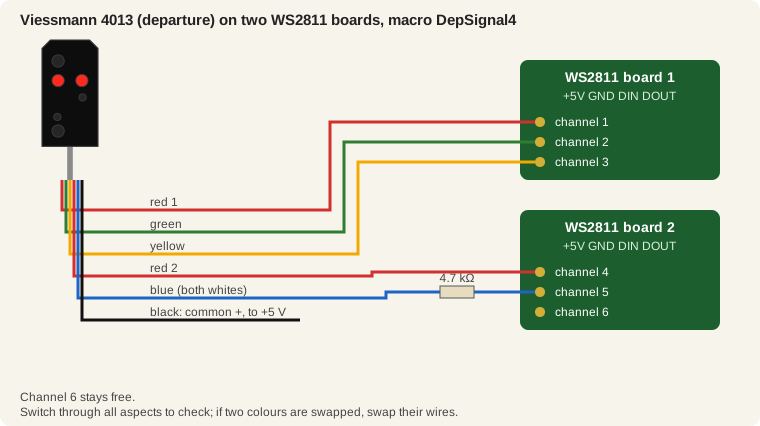
Use the Viessmann models with plain wires, one per lamp: 4010 to 4016, 4030, 4017 and 4018. In the 4013's colour code a white lamp is blue, and black is the common plus. The WS2811 switches the minus side, so black goes to +5 V and every lamp wire goes to its own output.
- The 4012 entry signal fits on one WS2811 with the
EntrySignal3macro. - The 4013 departure signal needs two, with
DepSignal4, which does Hp 0 + Sh 1 correctly: red 2 goes out, the whites come on. - For a 4011 block signal there's no macro. My suggestion is
EntrySignal3with the yellow channel left empty, and simply never send it Hp 2. - The distant signal and the combined signals have no ready macro. You can build their patterns in MobaLedLib's Pattern Configurator in the Excel tool.
The multiplex models (472x) and all Ks models don't fit, because their lamps share wires. Viessmann sells those for its 5229 or 52292 multiplexer. MobaLedLib does have a Charlieplexing program meant for them, but I haven't tried it.
Before you power up: the MobaLedLib wiki reports that Viessmann light signals work fine on 5 V boards, the reds need no extra resistor, and a 4.7 kΩ resistor in the white wire keeps the whites from blinding you. Do one signal first, step through every aspect, and only then wire the whole station. If two colours are swapped, swap the wires.
And in Hive-Rail
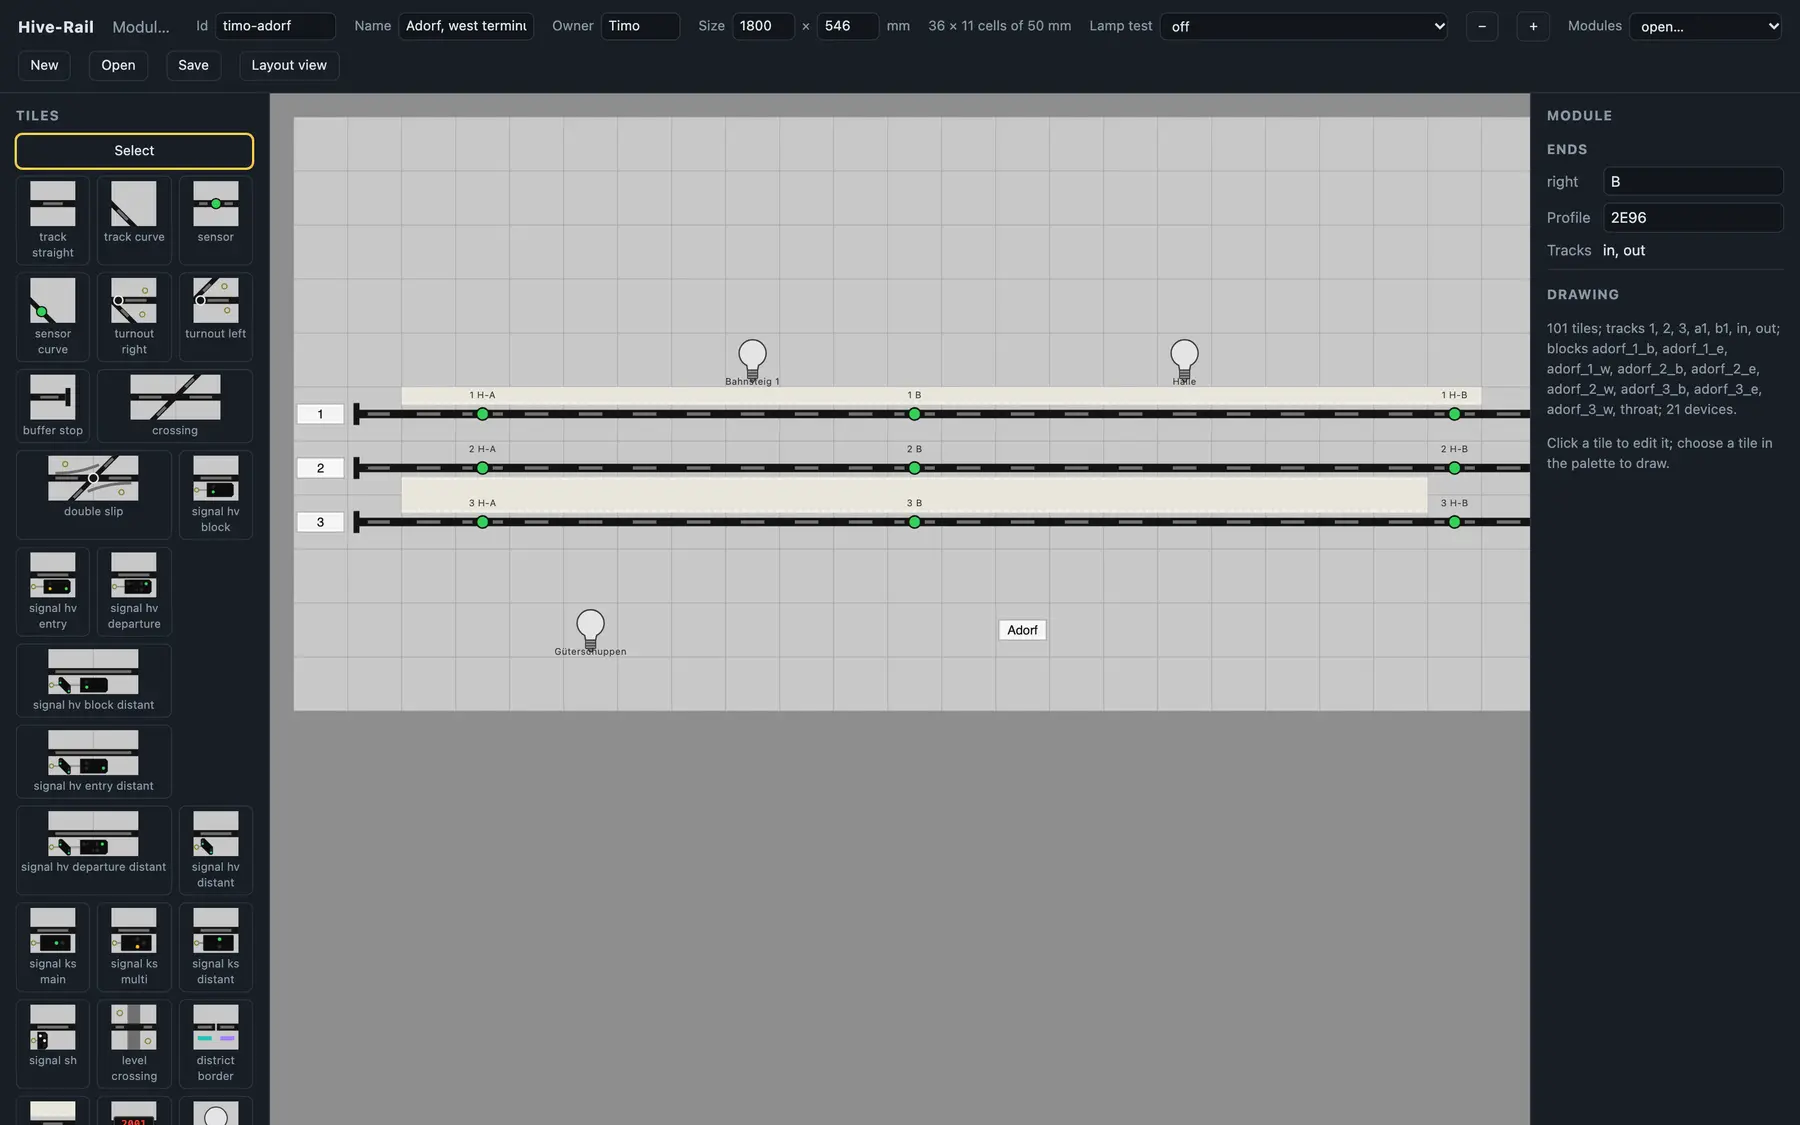
In Hive-Rail's module editor every signal is a tile, like a button on a Siemens SpDrS60 panel, lying beside its track.
The full details and every source are on the wiki:
If you spot something that doesn't match the rulebook, let me know. Better to fix it on the wiki than on your modules.